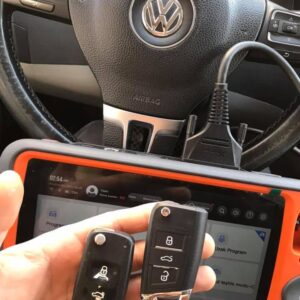
vvdi2-software-update

Xhorse VVDI2 Software V7.1.1 Update Free Download

Xhorse VVDI2 commander software V7.1.1 has released, please notice this version requires updating firmware V7.1.1 at the same time!!! 1.Software Dowload: https://mega.nz/file/QBlWSBBa#VGfdNGpsbJXJ7_xNVOPni6pWP5BzHUJDOAguYmw7PpA/url 2.Update info: ===== VAG V7.1.1 ===== 1. Support 2013-2019 A4L/A5/Q5 add key and all key lost; Support 2013-2019 A6L/A7/A8 get BCM2 immodata while allRead More…

XHORSE All Key Lost Cable For Ford

Xhorse All Key Lost Cable for Ford Smart Key Programming

Xhorse released new optional Ford All Key Lost Cable. it support all key lost while alarm on and no need to power off over and over again work with Key Tool Plus Smart Key All Key Lost Programming Ford taurus 2016 Ford Mustang 2016- Ford mondeo 201 6 Ford Expedition 2020 Ford Ecosport 2018- Ford everest 2016 Ford edge 2016 Ford Explorer 2016 Ford escape 2020 Ford Raptor F150 2018Read More…

vvdi-audi-bcm-adapter-using-tips-02

Xhorse VVDI Audi BCM2 adapter Using Tips

Xhorse VVDI Audi BCM adapter have been shipping one after another. Here are 4 using tips for everyone so that you will avoid problems during operation.   1st tip: For the BCM module that cannot be read out immo data via OBD, after removing it, be sure to confirm whether its version number is 0510 0521 0560 0572 0582 0633 0641 0650 0711. If it is not in this supported versRead More…

saab-9-3-2006-key-programming-by-vvdi-pro+vvdi2-success-7

Saab 9-3 2006 Key Programming by VVDI Prog+VVDI2 Success

Today, Xhorse.co.uk is going to bring you the process of Saab 9-3 2006 Add Key using VVDI Prog+VVDI2 with an unlocked ID46 key.   EEPROM: 93LC66 Tool: EEPROM adapter (included in package) New key unlocked with transponder PCF 7946/ PCF 7936   1.Remove CIM module Very tough job. Start ESL>> Adjust steering wheel to show two back slots out>>Press cRead More…

vvdi-prog5.0

Xhorse VVDI Prog V5.0.7 Free Update And Download

Xhorse VVDI PROG has been released the latest version V5.0.7 on Sept.24th,2021, 1.Free Download V5.0.7 VVDI PROG Software https://mega.nz/file/9KQhCayK#usYBDkN26nwCMz3fDkh8RFrVEeGVYhAm62cDxGyMccc Password:123456 (Security in mega, 1.23GB  ) 2.V5.0.7 VVDI PROG Update Info v5.0.7 (2021-09-24) * This version DON’t need update firmware + Modify LOCK_BCM2-1(ADAPTER),LOCK_BCM2Read More…

Audi-bcm2-adapter-with-vvdi-2-vvdi-prog-01

Instructions of using AUDI BCM2 Adapter with VVDI 2 & VVDI PROG

With VVDI PROG and VVDI BCM2 adapter, VVDI2 support: 2013-2019 A4L /A5/Q5 add key and all key lost 2013-2019 A6L /A7/A8 get BCM2 immo data while all key lost (Synchronize data can get from 3rdservice provider)(Add key can get BCM2 immo data directly via OBDII)   What we want to do today: Read and write Audi 5th Immobilizer System- Locked BCM2   Good to know: WRead More…

Bcm-adapter-audi-a4l-q5-2014--key-programming-16

Audi A4L /Q5 2014- key add and AKL programming with VVDI Key Tool Plus + BCM2 adapter

Is there any solution to read the blocked Audi BCM2? Yes, Xhorse BCM2 adapter is recommended, it can work with VVDI Key Tool Plus/ VVDI2+VVDI Prog to program Audi key (Add Key and All Key lost), no need to connect with VW Server. This article is about Audi A4L /Q5 2014- key add and AKL programming with VVDI Key Tool Plus + Audi BCM adapter. Prepare: VVDI Audi BCM2 Solder Free Adapter
Read More…

fix-xhorse-vvdi2-v709-dont-work-02

How to solve Xhorse VVDI2 v7.0.9 “cannot connect to car”?

After I upgrade Xhorse VVDI2 v7.0.9 don’t work for me, it shows ” Cannot connect to car, please switch on ignition and retry (look at the error images below): Please try the following methods: Connect the car to automatically detect the model to see if it can be found You have to update the hardware and the software 1). Xhorse VVDI2 v7.0.9 Software download and install. &nbRead More…

xhorse-dolphin-battery-test-02

How to Test battery storage or not for Xhorse Dolphin XP005?

Xhorse Dolphin XP005 Battery Test is necessary when it won’t turn on after pressing the power button. Attention: please recharge it for one hour or more Step 1.Remove 4 Screw two side of base, then remove base armrest Step 2.Put device on it’s one side, remove the screw marked on picture, remove base Remove the screw and unplug 3 connector, remember it original plaRead More…